Tuesday, March 12, 2013

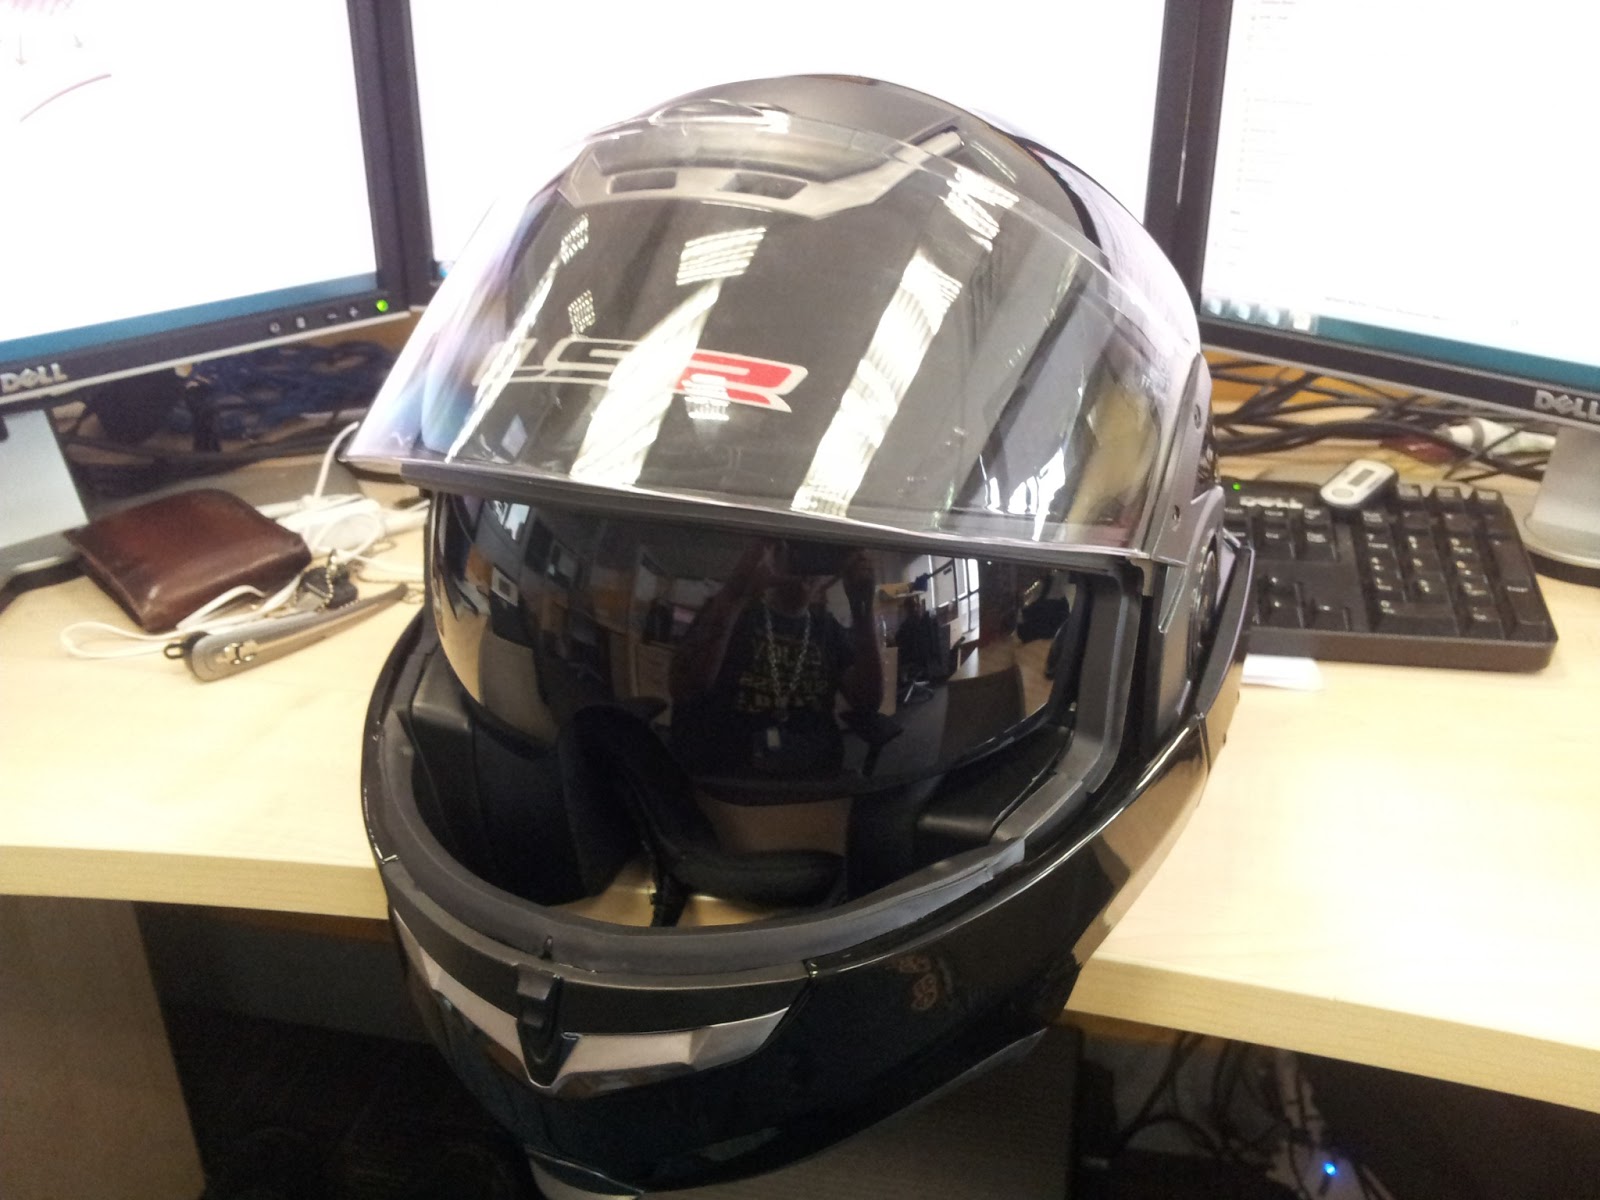
LS2 FF393 Convert Evo Aka Transformer

This is my review of the latest product I own. Recently, I had adopted a husky that was deprived of its childhood. So training it is a little tough. One day, while I was out, she escaped her cage and destroyed some things. Unfortunately for me, one of the things she munched on was my very favorite ¾ open face helmet.

Before this had happened, I was looking around for a 180 degrees modular helmet i.e. the Shark Evoline 3 and some other brands. Then while at a bike accessories store, I had come upon this brand spanking new 2013 model from LS2 that mimicked the Evoline 2 (this is because the visor has to be up before you can remove the chin bar.

Why did I choose this helmet when I'm riding a cruiser? Well here are a few reasons:

My handle risers are REALLY SHARP SPIKES that stare at me while I'm arched over speeding. -Being a rider of many bikes, I have done my share of falling and have had my share of “ouch” moments. I know what the spikes can do to me upon frontal impact.

I wanted a helmet that had a tinted inner visor and clear outer visor. –I have an issue with my eyes whereby I have to wear sunglasses till the sun don't shine. But it doesn't mean that it makes me batman or have night vision. No, I can’t see in dark roads just like you. So a clear visor though not as cool, does the job

I wanted a 180 degree rotating modular helmet. –Seeing how those spikes are there, a full face function when riding fast is a good idea, not to mention your head doesn't fly everywhere and you don't get the “parachute” effect. But I also like the wind in my face while not looking like I can receive satellite tv while the dumb chin bar is up.

So that's the reasons why I wanted one of these.. though they don't suit a cruiser much, at least its better than a full face helmet all the time.

Now, back to the review:

Being generally a full functioning full face design helmet, one does not expect the front visor to cover you all the way down to your chin. The visor covers up to past your nose, and seems to be just fine there. In open face mode with the visor down, you do not get any wind blowing in your face (tested other helmets that cover half your face, wind bends in and hits your eyes making it very tiring.

The helmet is very well vented with a very big glove friendly vent on the top of the helmet and a not so glove friendly but very big in air flow vent on the chin bar. There are 2 very nicely frenched in exit vents, some air grooves and a low spoiler on the back of the helmet.

On the left side of the helmet is a very big glove friendly swivel switch that is spring loaded for the inner tinted visor. If you are new, it will take some time to find with your hand but once you get it, I found its ok.

The chin bar is generally made of some hard impact resistant plastic that doesn't look too flimsy and the sides are latched with latches made of metal.

The rotation of the chin bar is managed by some grooves and some type of locking mechanism when you push it to the back of the head. However, I recommend that if you are planning to convert on the fly, don't lock both sides down. Instead just push one side in so it locks to make the one handed operation easier while riding.

The padding of the helmet is made of something called Outlast. It is advertised that this material is used to regulate the temperature in the helmet. How much it really helps I have no idea yet. However, my head was quite cool when I was riding but I think that it is due to the very big vent on the top of my head. The inside padding for the helmet was quite interesting as the sides where you temple is is slightly softer than the rest of the helmet. This is to make it more glasses friendly which is  a good thing for a 4 eyed old man like me.

The latch of the helmet is a little annoying as it is one of those 2 handed operation types where although it's a clip on, it needs 2 hands to remove it unlike those old car safety belt buckle types previously. A little annoying, but I don't mind.

I didn't test it in full face mode much today but, in open face mode with the visors down, I heard a lot of wind noise. Which is something I generally don't get from my ¾ open face helmet, that makes it something new. Being a full face by design, the side views are a little restricted too but that is normal for a full face helmet.

I had the opportunity to convert the helmet on the fly while riding earlier as a car was being an asshole. Its not much of an issue, but one had to push the outer visor up and then convert.. but the stability the full face mode gave me while I was speeding was crazy! Very little wind resistance and I didn't feel like my head was about to be ripped off.

Anyway, this is my initial review for now.

Good: sturdy, doesn't flounder in the wind, it looks friggin sick
Bad: wind noise, it is very heavy, if jawline locked in place, very hard to convert to full face on the fly.


EDIT: a couple of months ago, i had gone for a ride to blow off steam from work. i took a 90 degree corner wide in a narrow bike lane. i was doing it in full face mode. this helmet saved my life! THATS how good it is


By Vy

Monday, February 25, 2013

Steel lined gloves

As I had mentioned some time back in my previous post, I had recently purchased a vest for my friend Eelman and gloves for myself.

These gloves are generally impossible to find here in Malaysia and I was lucky enough to get in contact with a place that makes them. They are generally gloves where the protection for the fingers and knuckles that are usually made of carbon fiber (in my previous gloves) or PE are replaced by stainless steel.

The first time I saw these gloves was while I was watching biker buildoff. Matt Hotch was wearing them at the end of the build and they were then made by Icon. The model name is Icons TiMax which is now no longer in production.

When I first got the gloves, I was quite happy about it. Then when I touched it, I was surprised by how soft they were. Apparently they WERE real leather… it was just that I was not used to it as gloves here in Malaysia are generally bought and stored for a long time and eventually harden before you ever buy them. The only unfortunate thing was that though sizes in Malaysia, I wear an XL, these were one size too big for me. I had gotten quite worried about it but a good friend of mine says that after riding in the rain (which is like everyday here), it will slowly shrink. From what I can tell right now, they are slowly but surely shrinking. And if it doesn't shrink enough, I’ll just do the old warm water and rubbing alcohol trick.

Well, it has been a week (or less since I'm not always going to work) since I had worn them, the gloves are starting to feel ok and I'm getting used to wearing it. At first, I was concerned because my old gloves were racing gloves with the thicker, rougher leather that provides grip for the throttle. After a week of trying them out, I don't feel weird with the gloves anymore and feel that it is a part of me now when I ride. They also keep me warm in addition to my jacket as the long gauntlet covers the sleeves at night.

As I had mentioned, though the grips of the glove does not have the thicker and rougher palm section, the palm section is sewn with another layer to help a little. Quite like a slider for when one falls.

The fingers were sewn in sections to allow easy movements of the fingers and the gauntlet is very very wide to allow my thick jacket sleeves to go in.

Now, riding to work and all over the place has become slightly more fun as it attracts even more attention as I am riding. Talk about bling.


By Vy

Monday, February 18, 2013

Visor Water Resistance


For most people with open face helmets, you will sometimes notice that riding in heavy rain, there will be some rain water that will drip into the inside of the visor... thus blurring vission.... this isnt to stop the rain water from fully entering, but hindering it slightly.

Things needed:
  1. Rubber strips
  2. Silicone double sided tape
  3. Shears
  4. Helmet (duh)


  • Cut the length of the rubber strip that you need
  • Cut the thickness of the rubber strip to what you need
  • Line the strip with double sided tape
  • Stick it to your helmet


Simple right? Yet so many people dont do it... because they never think about it....

Do it now, you will thank me when it rains.


By Vy

Vest review:

I have recently helped a good friend of mine purchase a leather vest from a supplier. It just so happens I was looking for steel lined gloves. I was very very inspired when I first saw them being worn by Matt Hotch in one of the biker buildoffs. And found a company making some that were similar. But that's another story.

The thing is, here in Malaysia, the choices of design for vests are very limited and can range from 150 to 200 bucks for even a smelly used one that looks like it was worn by a girl in a mud wrestling match. Thus, since I had some contact with a supplier of leather products, we both decided to try buying a part each. Me with my gloves, and my friend (Eelman) with his vest.

The night I received the parcel, I quickly rushed over there to give it to him. This is what I have found so far:

The vest comes with a button up style fastener instead of a zip up. In my opinion, though it is slightly slower than having a zipper, it definitely is something very different. The buttons are very sturdy and hold on tight.

It comes with 3 pockets: 2 up top and 1 inside like a gun pocket but not really. The front 2 pockets are on the chest area with buttons for sealing as well. The inner pocket is an open type pocket something like those of a normal textile jacket.

This vest although slightly thicker than general vests is very soft and seems to have been pre-conditioned. However, it is a good idea to maintain it by applying mink oil to it.

The build of the vest resembles a T-shirt that has had its sleeves cut off. Thus just a little different. People here seem to be calling it the “sons of anarchy” look. I wouldn't know.


By Vy

Tuesday, February 5, 2013

Waterproofing


From my previous post, I had mentioned on how to change the bulb from normal halogen bulbs to HIDs.

However, in order to have these bulbs, you will most probably have to remove the waterproofing or the back of the spotlight totally. Thus a DIY waterproofing is needed.


Me having OCD when it comes to things like these found that my waterproofing actually kept out all the water from the spotlight compared to the normal standard one.

What you need:
  • Good thick plastic bag (the type used for keeping goldfish or drinks.. not d very easily biodegradable ones)
  • A plastic pipe of any round plastic cover
  • Lots and lots of wire tape.


What to do:
  • Shape the HID bulb to the correct shape if you don't already have one that fits (note the one on the left is shaped to fit) be careful with the length of the bulb, it may cause issues like arching when you install it)


  • Grab a rubber hose or plastic cover (in this case I used the bottom part of the container of the HID bulb) and make sure it has a snug fit to the back of the spotlight.


  • Cut the bottom of a plastic bag out so it makes an unbroken circle.


  • Wrap the plastic around the butt of the light


  • Pulling the plastic bag backwards slightly, slide on the hose/cover you made. The plastic bag will slide to the front a little when you have fit the cover on properly.


  • If the plastic is protruding out the front of the cover you made a little, fold it back. Then wrap the entire butt of the headlamp starting from the cover you made. Make sure when you circle with the tape you expose only ¼ of the tape you are taping over. This will ensure that more area is covered and waterproof. Twist the plastic bag up tight against the wire then continue wrapping. This will help as it will be a snug fit.


  • Done


By Vy

Tuesday, January 22, 2013

Headlamp Install


The Cyclops headlamp that came with the bike didn't light up much of squat when I was riding at night. So I set out on getting a pair of projector headlamps from a car accessories shop. So here is the guide on how to hook these up.

Things needed:
Thick wires (don't be cheap and buy those thin sorry excuses for wires) in whatever colors you want.
A relay or two (2 if you are using dual HIDs) if you are unsure if which rating to get, tell them it's the one for installing the air horns for cars.
Basic tools i.e. screw drivers, allen keys, socket wrenches
Fuse (optional)
Wire Tape/ Shrink Wrap

Step 1: Make sure the bulbs work, if not, get bulbs that work. Also, waterproof the sombitch by wrapping a small plastic bag around the area where the leads will come out. Using some good (not the cheap) wire tape, wrap up the whole thing well and good. (fig1)

Step 2: If you are using HIDs like me, you will need to run a relay through as motorcycle wires are not good enough to channel enough power to the ballast. The setup is simple, run a thick wire from the battery to the relay (you may install a fuse just in case 35a should cut it), connect it to connection 30 (power source), connect the lead from the stock headlight to 85 and connect 86 and the ground cable of the ballast to any grounding point of your choosing on the bike. Then, connect the positive terminal to connection 87 (normally off). Test your headlamp. (fig 2)

Step 3: Wrap all spliced wires with wire tape or shrink wrap and make sure all your wires are tucked nicely. Clipping of your cables on anywhere can cause a lot of issues. Once all that is done, tighten all your bolts and bring a wrench along with you when riding at night. It will take a few tries before you get the position of the light right.

 Fig 1

Fig 2

 where i put the relay

me working on the bike

Before.. with the Cyclops headlamp

End Product


By Vy

Been So Long


Wow, never realized that it had been so long since I had posted anything on bikes. Well, since I sold my bike I had been in a rut for a while. Lack of riding is like having withdrawal from drugs. Everyday I drive my car, I don't feel very happy.

Mid December, my wife had surprised me by telling me that I need a replacement for my car. As it was old and one of my friends wanted to sell me his. Since his was full of performance mods, it was quite an interesting buy except it was the same model of car as mine. After a lot of thinking, and sleepless nights, my wife then gave me an ultimatum, either choose the car or get a bike. Without further thought, I had chosen my bike. Although, just so I could hear what I chose as the right thing, I had asked a good friend and mentor of mine Mr Eel.

Confirmed that I wanted the bike, we proceeded to look for one that I liked. Thanks to Mr. Eel, I had gotten a good buy on a Dragstar/V-star 650 from his friend. There are some kinks here and there to iron out but that's fine.

The bike was readily bobbed by the owner with a hugger rear fender and a seat pan. Everything was powder coated with wrinkle paint. Although it was cool, it's a real bitch to wash. I found myself washing it everyday because of the wrinkle. Even before I had bought a bike I had already thought of a name for it (as an excuse to buy 4)… I named my first bike (regardless what it was) Pestilence. As in the first horseman of the apocalypse and had chosen the color scheme white. Oddly enough, the bike I liked was also white… I didn't chose it for its color.. in fact, I liked it because of its exhaust pipes.

I have been riding Pestilence for a few months now and have slowly been tweaking everything to suit me. I even removed the hugger fender and installed the original fender too. This makes it look longer and I can bring my wife around as well. And because the aftermarket Cyclops light was doing my night riding no good, I had bought 2 projector spotlights for cars and modified them to fit the bike. With low beam being halogen and the high beam being HIDs.

There are some other modifications that are coming up as I have been cooking them since I confirmed I wanted the bike. I can finally build my kite tank and have a very simple yet nice floating fender in design for my rear. However, it will take some time as I would like to focus on riding more than modifications.


By Vy