Wednesday, August 26, 2015

GPS tracker for your vehicle:

Things you will need:
1.       Sim card with free data (doesn’t have to be broadband)
2.       Phone (preferable Samsung because they are rated for the best GPS locking) S3s or notes are cheap now
3.       In car charger
4.       12v timer (optional)

Step 1:
Insert the sim card into the phone and make sure you set it up to have internet access

Step 2:
Ensure the following settings are done:
1.       Silent and no vibration mode
2.       GPS always turned on
3.       Set the screen lock to pin number

Step 3:
Install the software and configure them:
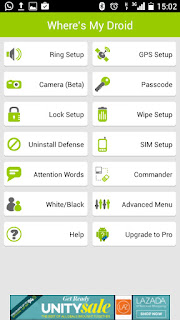
1.       Where’s My Droid
a.       Follow the setup instructions and be sure to setup an account for the commander
2.       Auto Answer Software
a.       Set to enabled
b.      Answer calls from only starred (ensure you star your own number and a few trusted friends.)
c.       Delay before answer 2 seconds
d.      Force speakerphone OFF
WHY:
Where’s my droid is a free tracking software that you can login to your account via the internet or via your phone. The idea is to track your phone which will be hidden in your vehicle. Its free unless you want to pay for upgrades which is cool.

Your GPS locking now is smart enough to triangulate your position via cell towers around you if there is no GPS tracking available at the time (in door or cloudy). That’s why you must ensure your internet connectivity is set up correctly.

Samsung devices (especially S3, Note 1 and up) have very fast GPS locking and lock on to more GPS satellites than other brands.

Auto answer software (this specific one and many others) are free and allow you to monitor the situation if you suspect your vehicle is stolen. This is more likely to be used if the device is in a car.

Step 4:
Locate a good place to hide your phone!
It must meet these categories:
1.       Dry place (unless you seal it in a sandwich bag)
2.       Not surrounded by metal (under a gas tank or anything like that) this dramatically reduces reception.
3.       Somewhere not obvious first place ppl will look:
a.       Car:
                                                               i.      Inside your dashboard
                                                             ii.      Under your seat
                                                            iii.      In your glove compartment
                                                           iv.      Under the hood
b.      Bike:
                                                               i.      Under your seat
                                                             ii.      Behind your headlamp
                                                            iii.      In your saddle bags

Step 5:
Wire shit up

1.       Disassemble the cigarette lighter usb charger.
2.       Extend the red and black wires as long as you need them.
3.       Connect the red to the positive terminal of your battery and the black to the negative terminal of your battery.
4.       Additional: you may connect a 12v timer if you don’t want to keep juicing your phone for no reason. Wire the timer to the battery then connect the charger to the positive and negative terminal to the timer. Suggested charge times would be 2-4 hours every 12 hour intervals.
Step 6:
Test your stuff

Sms the command to your phone and wait for the location.

Step 7:
Button everything up


 Where's My Droid

Auto Answer

Disassembled Charger

Results of Location Search


By Vy

Monday, August 17, 2015

Seat Pressure Sensor

 Are you sick of people sitting on your bike but refuse to get those lame super sensitive alarm systems for your bike?

Here’s a simple guide on how to make a pressure sensitive siren that only goes off if someone sits on your bike

Things needed:
1.       Automotive 5 pin relay (30 to 40 amp relay)
2.       Wire
3.       Spring
4.       Microswitch
5.       Siren
6.       Fuse
7.       Wire tape
What to do:
I will not write up on when to wrap the wire with wire tape, if you don’t know, you shouldn’t be doing this!

Step  1: Figure out stuff:
Find out the following:
1.       Where is a key activated positive (check your headlamps or meter light)
2.       Where to mount your siren discreetly.
3.       Grounding Points
4.       How to mount the pressure switch with a spring
Step 2: Hook everything up:
1.       Connect the positive lead of the siren to a fuse (30 amp)
2.       Connect the fuse lead to the positive terminal of your battery
3.       Connect the negative terminal of the siren to connector 87A on the relay
4.       Connect relay terminal 30 to the microswitch and from the microswitch to a good ground or battery negative terminal
5.       Connect the key activated positive (low amp discharge will be fine) to relay terminal 86
6.       Connect relay terminal 86 to a good ground location or negative battery terminal.


Micro Switch

Spring (an old valve spring or clutch spring)

Automotive Relay


Siren


30 = Ground

87A = Siren Negative Terminal
86 = Key activated positive
85 = negative/ground

By Vy

Roof Boxer V8 Bond

The roof boxer has been around for quite some time. There have been a lot of talk that the Roof Boxer was the first full convert helmet ever created while the Shark evoline had taken it and “improved” on it.
I had first come across the Boxer some time ago when it was called the “Boxer V”. I am unsure of how many instances of the Boxers there were but I have seen the Boxer, Boxer V and the Boxer V8.

To me, personal protection is a very important thing that is why I would never go for cheap replicas of anything especially helmets. But seeing the price of the Boxer V at the time in Malaysia really put me off. Although I had started oogling at helmets like the Icon Variant, the Boxer was never far from my mind. Finally, years later, I had tracked down the sole distributor in Malaysia and purchased the latest variant of the boxer. Enter:  the Roof Boxer V8 Bond 2015.

After remouting my camera mount and installing the speakers into the Boxer, I had finally retired the LS2 transformer to storage thanking it for its service and protection all these years. That helmet saved my life before and I will be forever grateful for that.

Today was the first day I had managed to test the Boxer as I was going to work and hadn’t ridden Pestilence the whole weekend and of all days my work starts at 9am. Although the helmet was a little lighter than the LS2, the Boxer felt very sturdy on your head. I began by riding it in Jet Mode. This meant that the jawline was up and over while the visor was down. With the new iridium blue visor, the morning sun was no big deal coupled with my day glasses (in case you all didn’t know I have issues with my eyes where I cannot see bright lights this day glasses = dark tinted glasses). Wind noise was at least 50% softer compared to the LS2 in open face mode though it allowed enough sound to pass through for me to hear traffic. This coupled with my speakers made the ride feel like I was in a nice limo.

Not going too fast, the helmet did very well with wind and did not create much wind resistance. One of the biggest shortcomings of the LS2 was that it had a very big imprint size wise thus causing wind resistance while riding both in open and full face mode. The odd thing was that even with the visor up, the resistance to air was kept at a minimal.

Once I hit a small stretch of open highway, I had converted the helmet to full face mode expecting even less noise from the already acceptably quite helmet but it would seem that I had made no difference in the helmet. As many of the other reviewers had mentioned, when the helmet is in full face mode, there will be a little hole where the “nose” of the jawline and the visor meet, this causes wind to come in unless you forcefully shove it shut. I personally see that as a good and bad thing as this allows a lot of air into the helmet allowing you to breathe well and also stops fogging even when you are stopped. It especially helps claustrophobic riders like myself  from feeling boxed in. and unlike my LS2, upon converting to full face mode, the helmet does not create a vortex sucking air from your helmet making it hard to breathe (not sure if I’m alone in this). The downside about the little gap is that if it rained it would be fun.
Little Gap In the Middle Lets Air In

The vents on the V8 Bond are plentiful. There are 4 stationary reversed vents at the jawline and 2 collapsible vents at the nose which unfortunately are a little flimsy and seem to prefer to be closed (they do it themselves!). The top has venturi vents controlled by a flimsy little slider. When the ports on the top are open, the gap is only about 1 to 1.5mm gap for both the front and back vents. Surprisingly, the air flow is amazing. When I started moving from my house I felt a draft on my forehead and thought I did not position my helmet properly or I had forgotten to lower the visor, but it was all correct. Even so, the helmet was rather quiet.

Single handed conversion while riding is a little tricky, maybe because the helmet is still new so the mechanism which is friction controlled is still tight. I will continue to monitor this point of it and if needed, will adjust it to work well.

It is too new to say for sure, but overall, it’s an amazing little helmet which fits well and because my jacket is a straight collared leather jacket, this shorter profile helmet doesn’t hook to my collar when I turn my head anymore.


By Vy